Pages

Wednesday, 10 April 2013

If Paper Is Jammed inside the Printer - Canon Printer

,

IF Paper Is Jammed inside the Canon Printer Machine 

Remove the paper following the procedure below.

1. Turn off the machine, and unplug the power cord of the machine from the power supply.
2. Open the scanning unit / cover.

IMPORTANT

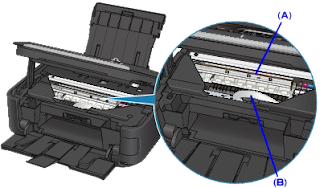
Do not touch the clear film (A) or the white belt (B).
If the paper or your hands touch these parts and blot or scratch them, the machine can be damaged.


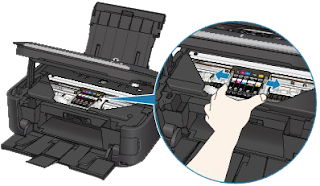
3. Make sure that the print head holder does not hang over the paper.

If the print head holder hangs over the paper, move the print head holder to the right edge or the left edge whichever is easier to remove the paper.

When you move the print head holder, hold the top of the print head holder and slide it slowly to the right edge or the left edge.

4. Hold the jammed paper with your hands.
If the edge of paper is jammed near the paper output slot, pull the edge of paper to the position where you can hold it with your hands.
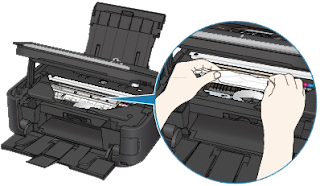

5. Pull the paper slowly not to tear it, then pull the paper out diagonally forward in front at aslant.
Keep an angle of the paper about 45 degrees and pull it slowly.
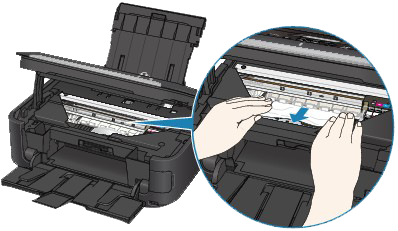

6. Make sure that all the jammed paper is removed.If the paper is torn, a piece of paper may remain inside the machine. Check the following and remove the piece of paper if it remains.

Does the piece of paper remain under the print head holder?
Does the little piece of paper remain inside the machine?
Does the piece of paper remain in the right side or the left side space (A) inside the machine?
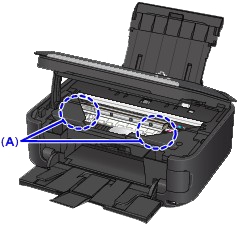

7. Close the Scanning Unit (Cover), then reload the paper.
All print jobs in the queue are canceled. Reprint if necessary.

REFERENCE

If the message about paper jam is displayed when you resume printing after removing all the jammed paper, a piece of paper may remain inside the machine. In this case, confirm that no piece of paper remains inside the machine.

If you cannot remove the paper or the paper tears inside the machine, or if the paper jam error continues after removing the paper, contact the service center.

Read more

Wednesday, 19 September 2012

Canon Pixma E500 CISS installation - Youtube

,
 

Canon Pixma E500 CISS installation- Youtube


The PIXMA Ink Efficient E500 is built to give you an affordable printing experience. Besides print, copy and scan functionalities, the PIXMA E500 also offers innovative Full HD Movie Print and Fun Filter Effect to dramatize your photos.


Maximum Printing Resolution
4800 (horizontal)*1 x 1200 (vertical)dpi

Print Head / Ink    
Type:     FINE ™ Cartridge
Total Number of Nozzles: 1792
Ink Droplet Size (min.): 2pl
Ink Tank: PG-88, CL-98
Print Speed Based on ISO / IEC 24734.
Click here for summary report
Click here for Document Print and Copy Speed Measurement Conditions    
Color : Approx. 5.0ipm
Black :Approx. 8.6ipm

Printable Width Up to 203.2mm (8-inches)
Borderless: Up to 216mm (8.5-inches)

Ink End Sensor Dot count
Print Head Alignment Manual
Scanner Type Flatbed
Scanning Method CIS (Contact Image Sensor)
Optical Resolution*4 1200 x 2400dpi
Selectable Resolution 25 - 19200dpi


More info Here  
Download Driver and Software Here 
Read more

Tuesday, 17 July 2012

Web for Download CISS Installation Manuals

,


GREAT WEB FOR DOWNLOAD INSTALLATION MANUALS

Great site to learn CISS installation

Continuous Ink Supply Systems (CISS)

Here you can find Installation manuals for the majority of Continuous Ink Supply Systems for printers, all-in-ones, and plotters from Epson, Canon, Hp, Brother, and Roland from INKSYSTEM company. Lot of  quality of Installation Manuals and Videos here.

Usage of CISS
How does Continious Ink System works: watch video
Comparison of printing quality: CISS and original cartridges watch video

Refilling of CISS
How to refill INKSYSTEM CISS: watch video

Reset chip
How to reset chip on NKSYSTEM CISS: watch video
How to install Continuous Ink Supply Systems (CISS)

More info get it HERE


Source from http://www.inksystem.org/instrukcii.htm

7CJDA5CHSMK7
Read more

Tuesday, 19 June 2012

Locate and Repair Common Printer Problems Using HP Diagnostic Tools

,
Can Download Here

HP Print and Scan Doctor was designed by HP to provide users with the troubleshooting and problem solving features needed to resolve many common problems experienced when connected to Windows-based computers. 

Simply run the tool and follow the on-screen instructions

System requirements:       
Windows XP(32bit only) with Service Pack2 and above
Windows Vista (32 and 64 bit)
Windows 7 (32 and 64 bit)
You must have administrative privileges for your PC
Read more
 

How to Service my Printer Copyright © 2011 -- Template created by O Pregador -- Powered by Blogger